blog, commercial blog, floors, walls
When it comes to interior design, every element holds the power to influence our emotions and perceptions. Tiles, in particular, play a significant role in creating the ambiance of a space. The choice of tile style can have a profound psychological impact on how we experience and interpret an interior. In this blog, we will explore the fascinating connection between tile styles and the human psyche.
Let’s delve into the intriguing world of the psychological impact of tiles.
1. Serenity and Tranquility: Natural Stone Tiles
Natural stone tiles, such as marble, granite, or travertine, evoke a sense of serenity and tranquility. These tiles are associated with nature and the organic world, offering a soothing and grounding effect. The earthy hues and unique veining patterns create a connection to the natural world, fostering a calming and peaceful atmosphere. Incorporating natural stone tiles into interiors can evoke feelings of relaxation, making them ideal for bathrooms, spa-like retreats, and areas where tranquility is desired.
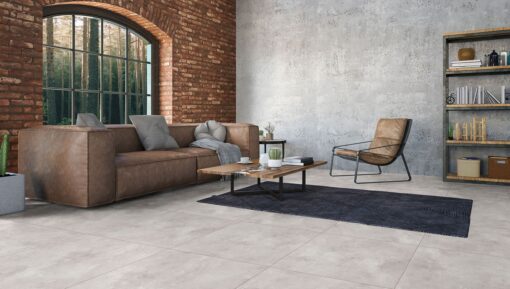
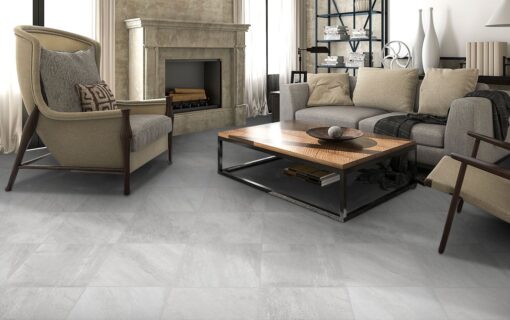
2. Elegance and Sophistication: Porcelain and Ceramic Tiles
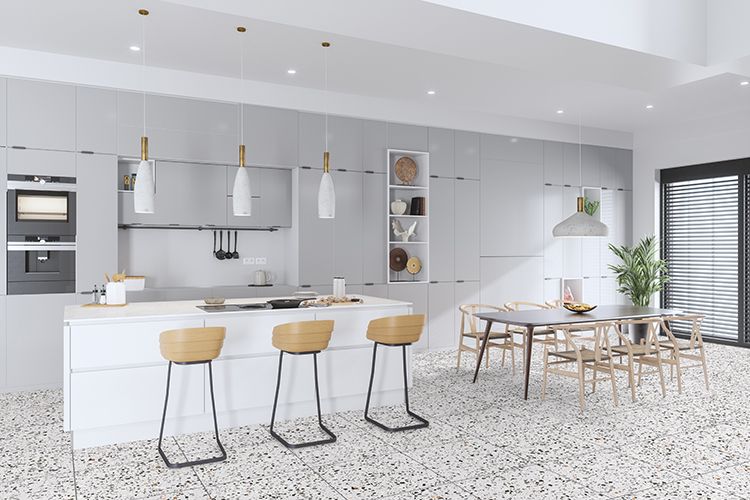
Porcelain and ceramic tiles are renowned for their versatility and ability to mimic various materials. They offer a wide range of styles, from sleek and minimalist to intricate and detailed designs. These tiles exude elegance and sophistication, imparting a sense of refinement to any interior. Their clean lines and polished finishes create a modern and contemporary aesthetic. Whether used in kitchens, living rooms, or hallways, porcelain and ceramic tiles elevate the overall ambiance, adding a touch of timeless elegance.
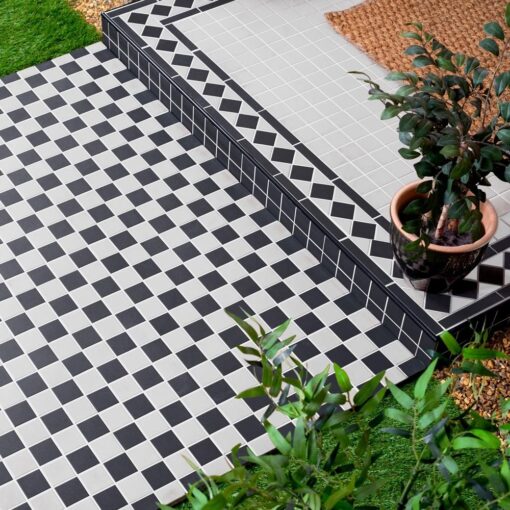
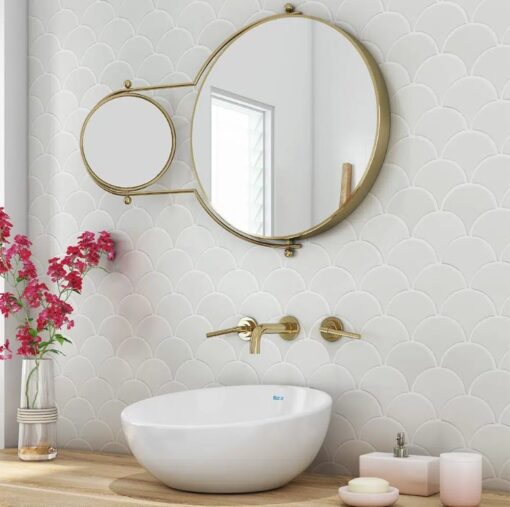
3. Playfulness and Vibrancy: Mosaic Tiles
Mosaic tiles are a fantastic way to inject playfulness and vibrancy into a space. Composed of small, intricate pieces, mosaic tiles come in a plethora of colors, patterns, and materials. They offer the opportunity for creative expression, allowing homeowners and designers to customize their interiors with unique designs and motifs. Mosaic tiles can create focal points or accent walls, infusing energy and liveliness into kitchens, bathrooms, or even outdoor spaces. They inspire joy and evoke a sense of whimsy, perfect for those who want to make a bold statement.
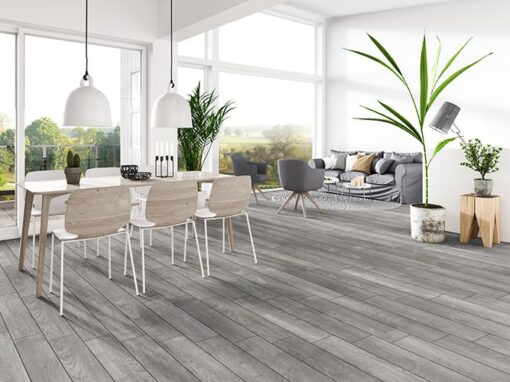
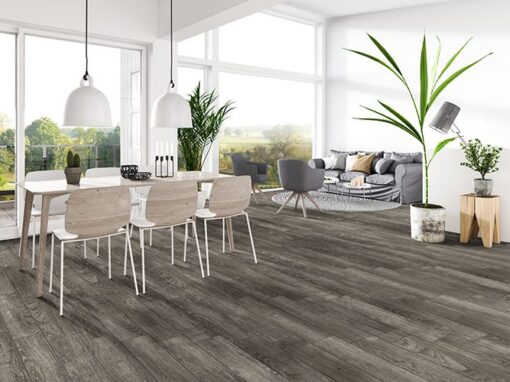
4. Warmth and Comfort: Wood-Look Tiles
Wood-look tiles provide the warmth and comfort associated with natural wood flooring but with added durability and ease of maintenance. These tiles replicate the appearance of wood grains, knots, and textures, bringing the charm and coziness of a rustic cabin or a beachside cottage. Wood-look tiles create a welcoming and inviting atmosphere, making them ideal for living rooms, bedrooms, or any area where a cozy ambiance is desired. They evoke a sense of familiarity and create a connection to nature, promoting a comforting and nurturing environment.
5. Modernity and Boldness: Geometric Tiles
Geometric tiles are a statement in modern design, offering a bold and contemporary aesthetic. With their striking patterns and shapes, geometric tiles add visual interest and depth to any space. From hexagons and triangles to intricate tessellations, these tiles create a sense of movement and dynamism. Geometric tiles are perfect for those seeking a modern, edgy, and visually captivating interior. They can be used as feature walls, backsplashes, or flooring, making a strong impact on the overall design.
The psychological impact of tile styles cannot be underestimated. Each tile style has the potential to influence our experiences and interpretations of an interior. From the calming serenity of natural stone tiles to the playful vibrancy of mosaics, the elegant sophistication of porcelain and ceramic tiles, the warmth of wood-look tiles, to the boldness of geometric tiles, the choices are vast and varied.
Consider the psychological impact of tiles as you embark on your next interior design project and let the chosen tiles shape the experiences within the space, creating a harmonious and uplifting environment for all.

blog, commercial blog, floors, walls
Are you looking for inspiration for your next home renovation project?
Look no further than the world’s most beautiful tilework!
From intricate mosaics to stunning geometric designs, these top tiling projects from around the world will leave you awestruck. Whether you’re a DIY homeowner or an interior designer, these examples are sure to spark your creativity.
Alhambra Palace, Granada, Spain
The Alhambra Palace in Granada, Spain is a stunning example of Moorish architecture and design. The intricate tilework throughout the palace is a testament to the skill and craftsmanship of the artisans who created it. The use of vibrant colors and geometric patterns creates a sense of harmony and balance that is truly breathtaking.

Alhambra Palace, Granada, Spain
Sheikh Zayed Grand Mosque, Abu Dhabi, UAE
The Sheikh Zayed Grand Mosque in Abu Dhabi is a modern masterpiece that combines traditional Islamic design with contemporary elements. The marble and tilework throughout the mosque is simply stunning, with intricate floral and geometric patterns that are both intricate and eye-catching.

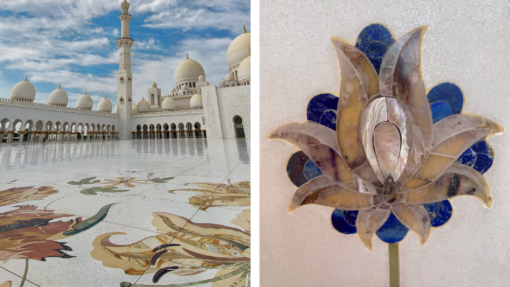
Sheikh Zayed Grand Mosque, Abu Dhabi, UAE
Park Guell, Barcelona, Spain
Park Guell in Barcelona, Spain is a whimsical wonderland of tilework created by the famous artist Antoni Gaudi. The park features an array of colorful mosaics, intricate patterns, and playful sculptures that are sure to delight visitors of all ages.

Park Guell, Barcelona, Spain
The Blue Mosque, Istanbul, Turkey
The Blue Mosque in Istanbul, Turkey is a stunning example of Islamic architecture and design. The mosque is famous for its beautiful blue tiles, which cover the walls and ceilings of the interior. The use of light and shadow creates a serene and peaceful atmosphere that is both calming and awe-inspiring.

The Blue Mosque, Istanbul, Turkey
Casa Batllo, Barcelona, Spain
Casa Batllo in Barcelona, Spain is another masterpiece created by Antoni Gaudi. The building is famous for its colorful and whimsical tilework, which covers the entire façade. The use of vibrant colors and playful patterns creates a sense of joy and wonder that is truly unique.

Casa Batllo, Barcelona, Spain
In conclusion, these examples of the world’s most beautiful tilework are sure to inspire DIY homeowners, consumers, and interior designers alike. Whether you’re looking for traditional Islamic design, contemporary twists on classic styles, or playful and whimsical patterns, there is something for everyone in these top tiling projects from around the world.
So why not incorporate some of these stunning designs into your next renovation project and create a space that is truly breathtaking?

commercial blog
In parts 1 and 2 of ‘How to Read a Tile Specification’, we examined the dimensional tests, water absorption and structural tests. In the third and final part, we’ll look at slip resistance – a crucial factor for installing tiles in outdoor areas, commercial kitchens, bathrooms and commercial spaces where slipping can be a hazard and a legal issue.
Slip Resistance
Item 15 tests for Slip resistance. Floor slip resistance testing is the science of measuring the Coefficient of Friction (CoF) of flooring surfaces, either in a laboratory or on floors on site. Flooring is tested using a tribometer (a floor slip resistance tester) to determine if there is a likelihood for slip and fall accidents, either dry or most often when wet with water or lubricated with other slippery substances.
A Static Coefficient of Friction (SCoF) is unreliable. Often used in the US for assessing safety, SCoF measurements are often misleading where flooring gets wet or otherwise lubricated in use. The Ceramic Tile Institute of America and the Tile Council of North America have ruled the method to be inadequate for assessing slip safety. The slipperiness of flooring materials can change significantly due to the installation process. For instance, grouting; cleaning or polishing; inappropriate maintenance or longer-term wear also change the slip resistance of flooring. Data quoted simply as CoF should be viewed with uncertainty. DCoF means Dry Coefficient of Friction.
Three Viable Methods:
The Pendulum Tester
This is a national standard for pedestrian slip resistance in 49 nations. It is the most widely used pedestrian slip resistance test method worldwide. The pendulum uses a standardised piece of rubber, which is set up to travel across the flooring sample mounted onto a pendulum device.

A Digital Tribometer
This is used as the test instrument for America’s ANSI B101.3 test standard, which measures dynamic friction at a lower speed than the pendulum. This particular tribometer, a BOT-3000, is also a drag-sled meter, which means that it crawls along the floor under its own power at a constant speed measuring the resistance to slip of a standardized piece of rubber loaded into the bottom of the machine.
The Variable-Angle Ramp
This is a German-developed method for obtaining pedestrian slip resistance values. Flooring samples are mounted horizontally on the ramp tester and an operator clad in safety boots or bare feet performs a standardised walk up and down the sample while wearing a harness to stop the operator from being injured. The sample is slowly inclined until the operator slips on the surface. The angle at which the subject slips is then recorded. Two operators repeat this test three times and then an average is calculated. The repeatability of this test method is reliable.
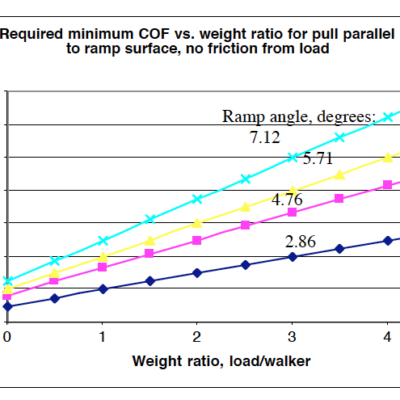
Co-efficient of slip resistance: dry vs. wet surfaces
Dry slip resistance is not an indicator of wet slip resistance, in fact, the two often vary inversely. Therefore, reliable wet slip resistance testing is often needed as well as reliable dry testing. Slip resistance is tested both with footwear and barefoot. This is especially important when testing areas which are normally sloped and/or wet such as swimming pool surrounds or exterior access ramps. In the tile industry, an ‘R’ rating is used to indicate slip resistance. This rating correlates with an angle of inclination; the steeper the angle, the higher the slip resistance and the higher the R rating. US standards require a minimum Dry CoF of 0.42.
R rating for dry surfaces Recommended for

Slip resistance groups:
Barefoot on wet surface. Recommended for

If you have any technical questions relating to tiles, you are most welcome to contact our Tiletoria Showroom’s to speak to our experts. Our experts offer technical training that is available online or in office with your architectural team. We are also SAIAT accredited to issue CPD credits.
commercial blog
In the second part of this series, we’ll be looking at the structural tests and ratings. These tests from numbers 7 to 14 on the spec sheet below provide an indication of how structurally sound a tile is. They are important because they show how tough a tile is, how resistant it is to wear and chemical attacks.

Tile Specification Sheet
Breaking Strength
Item 7 is the Breaking strength. Breaking strength is measured in Newtons, which is a measure of force, specifically the force necessary to provide a mass of one kilogram with an acceleration of one metre per second. During the test, a hydraulic ram applies force to the tile until it breaks. This is important because furniture, vehicles and even shoe heels can produce considerable ground pressure, which especially of the tile is laid on an uneven subsurface can lead to cracking.
Rupture Modulus
Item 8 is the Rupture modulus. This test is related to the breaking strength and is also an indication of how much stress the tile will take. Essentially it measures how much the tile will bend before it breaks. It is measured in ‘Pascals’, which are one Newton per square metre, meaning that larger and longer tiles will break more easily. This measure is particularly important when specifying long wood-look plank tiles and large format tiles.
Abrasion Resistance
Item 9 Abrasion Resistance. This is a measure of Abrasion resistance i.e. how well a tile withstands scratching and scraping. Glazed tiles are measured in revolutions of an abrasive disc that the tile is subjected to before it leaves a visible mark. Unglazed tiles are measured in cubic millimetres of material removed.
Tile Hardness
Item 10 is the Hardness of the tile, which is very important. It’s a measure of scratch resistance and is tested with a set of scratch pencils tipped with various minerals from soft amber (Mohs 2) to diamond (Mohs 10).
PEI Rating
Item 11 is the tile PEI Rating. Glazed floor tiles are classified under a Porcelain Enamel Institute (PEI) rating for the suitability of fixing in a particular location. This is a useful measure because it is calculated by combining a number of tests including hardness and breaking strength. Note that through (full) body porcelain tiles, as a rule, do not have a PEI rating as they are very hard wearing.
This rating defines the Group of the tile:
PEI Class I: Ceramic tile suggested for residential and commercial wall applications only.
PEI Class II: Ceramic tile suggested for interior residential and commercial wall applications and for residential bathroom floor applications only.
PEI Class III: Ceramic tile suggested for residential floors, light to moderate traffic areas only, e.g. bathrooms, halls, living rooms and wall applications.
PEI Class IV: Ceramic tile suggested for residential floors, moderate to medium traffic areas, e.g. bathrooms, halls, kitchens, conservatories and wall applications.
PEI Class V: Ceramic tile suggested for all residential floors, medium to heavy traffic areas, e.g. commercial floors and wall applications.
Frost Resistance
Item 12 tests Frost resistance. This test subjects the tile to several cycles of heating and cooling to sub-zero temperatures. It’s an important measure because it gives an indication of how well the tile will withstand outdoor conditions, especially in areas of extreme weather.
Resistance to Acids, Alkali and Chemicals
Items 13 and 14 refer to the Resistance to acids, alkali and chemicals where a simple grade is allocated. This test method entails the subjection of test specimens to the action of test solutions and visual determination of attack after a defined period. Typical chemicals are: household chemicals; swimming pool salts; acids and alkalis of both low and high concentrations. This is an important test for tiles that will be used in commercial kitchens and bathrooms & swimming pools.
In the final part of ‘How to Read a Tile Specification’, we’ll look at the slip-resistance of a tile – a crucial factor for installing tiles in outdoor areas, kitchens, bathrooms and commercial spaces where slipping can be a hazard and a legal issue.
If you have any technical questions relating to tiles, you are most welcome to contact our Tiletoria Showroom’s to speak to our experts. Our experts offer technical training that is available online or in office with your architectural team. We are also SAIAT accredited to issue CPD credits.

commercial blog
There are many different tile surface finishes. Surface finishing refers to the process of a tile in order to achieve certain textures such as roughness or smoothness. Each finish is appropriate for particular applications and some finishes are highly inappropriate for other applications.
Here are the various surface finishes and where they work/ don’t work:
Polished Finish

This type of finish is highly reflective, very smooth and is achieved by being polished with multiple heads. It’s an impressive finish, especially in large areas such as hallways but is rather slippery in nature.
Works well in: Interior public spaces, lounges, hallways, dining rooms.
Doesn’t work in: Entryways, especially in commercial areas. Showers and outdoors, especially around pools – too slippery.
Lapatto Finish
This type of finish is semi-polished and is achieved by being polished with an abrasive wheel but not long enough to achieve the same level of sheen of actual polished tiles.
Works well in: Lounges, dining rooms, hallways.
Doesn’t work in: Outdoors or entrance areas exposed to weather.
Matt Finish

A matt finish is an all-round good finish. It is smooth and natural looking but has a non-reflective surface and better non-slip properties.
Woks well in: Entryways, lounges, dining rooms, kitchens & bathrooms.
Can be used outdoors but not ideal.
Bush Hammered Finish
With natural stone tiles this finish is achieved with tools such as a chisel in order to obtain a rustic, rough surface. With ceramic and porcelain tiles the texture is pressed into the tile body. A bush hammer finish tends to be a consistent bumpy surface across the tile which improves anti-slip properties.
Works well in: Outdoors, entryways, lounges, dining rooms, kitchens & bathrooms.
Doesn’t work well in: Kitchens and bathrooms because dirt can accumulate, and mould can form.
Textured finish
This type of finish is similar to Bush Hammered and tends to emulate the material it resembles so wood-look tiles are pressed with a wood grain, rock-look tiles, like slate will be pressed with natural variations resembling the stone. Textures can be generic, the same texture pattern on all tiles or in-register meaning that the texture exactly matches the design of each tile.
Works well in: Outdoors, entryways, lounges, dining rooms, kitchens & bathrooms.
Doesn’t work in: Kitchens and bathrooms can be high maintenance if using this finish.
commercial blog
What are Movement & Perimeter joints?
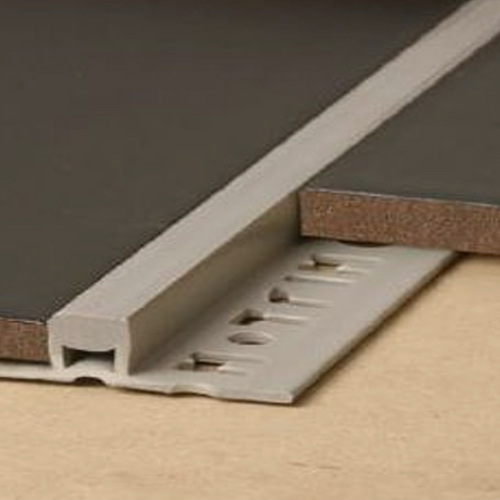
A movement joint, also known as a soft joint, is the interruption of the surface to allow for movement. Simply put – a movement joint is a gap or space next to a tile that lets a tile floor move a bit. There are two kinds of movement joints: expansion (movement) and perimeter.
A movement or expansion joint is usually a grout joint that is left ungrouted. Usually it gets filled with a flexible caulking (this sealant must be 100% silicone, urethane or polysulfide) that matches the grout colour so that you don’t even see the movement joint.
Selection of movement joint type will depend on joint width requirement, finished floor use and movement capability. The range of materials available and their typical area of use include: aluminium for general commercial installation; brass or stainless steel for heavy commercial and industrial use; and PVC for most other applications. This ungrouted grout joint would have to extend from wall-to-wall to be effective.
Perimeter joints are the kind that every tile installation should have. When you place a tile up to (abuts) a wall, it should have a gap (minimum of 5mm) between it and the wall. There should be a gap around the entire floor (or wall). This gap must be free of any adhesive or debris. Typically, this gap doesn’t get filled with anything.
Why Do You Need Expansion Joints When Installing Tile?
The reason they are so critical is that without them, most installations which otherwise appear to be well done, can fail. Without enough room for the tile assembly to expand, the tile/s will pop up or “tent” most times in the middle of the floor. This situation can occur in both commercial as well as residential jobs.
Here is an unfortunate example of tiles ‘tenting’:
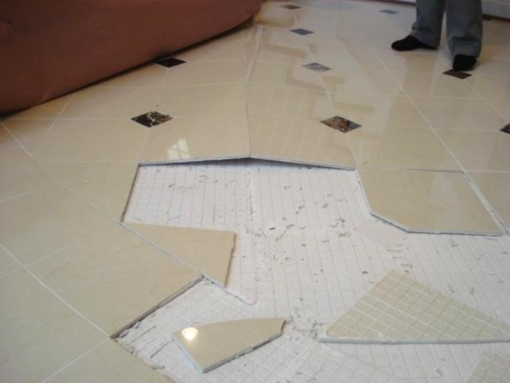
Expansion joints are not optional – they are a requirement.
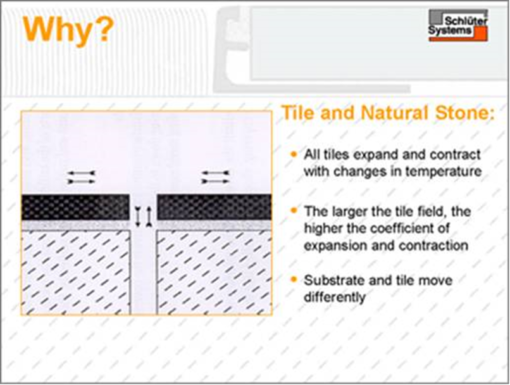
Expansion and Perimeter joints are needed because all tiles expand and contract with temperature and moisture changes. In almost every case, the substrate will move differently to the covering material. The larger the tile field, the more it will expand and contract, and be vulnerable to failure. Movement joints accommodate the differential stresses within each “field” of tiling, so they don’t build up to a level which would cause shearing stresses at the bonded interface, protecting the tiles from cracking, tenting and debonding.
Stresses from drying shrinkage; deflection and moisture movement in the substrate; plus thermal and moisture changes, affecting the flooring, can cause loss of adhesion, resulting in bulging or cracking of the floor. Building movement may occur due to changes in conditions, physical movement due to size, settling or drying out of the building, weight loading, level of trafficking, thermal changes or simply due to the construction design itself.
In particular, deflections in suspended floors can induce high compressive stresses in rigid floor tiling, and may be the principal cause of “hollowness” in those situations. The shear stress resulting in the substrate and ceramic moving differently from each other is often too great for the adhesive to hold – shown in the top picture.
Therefore, stress-relieving joints are an essential part of any tiling installation, and should be incorporated at the design stage.
Location
- Floors – movement joints should be provided:
- Over existing and/or structural movement joints
- Perimeter joints (minimum gap of 5mm) should be inserted at door thresholds and next to surfaces such as perimeter walls, columns, curbs and steps
- In larger internal floor areas, intermediate movement joints should be provided to form bays of size not greater than 10m x 10m (where large degrees of thermal movement or vibration are expected, the frequency of movement joints should be increased to accommodate the movement)
- In larger external floor areas, intermediate movement joints should be provided to form bays of size less than 10m x 10m
- On suspended floors, stress relieving joints should be inserted where flexing is likely to occur, e.g. over supporting walls or beams
- Internal floors, which might be subjected to significant thermal changes, i.e. direct sunlight or underfloor heating etc, the floor area should be divided up by intermediate movement joints provided at 5m intervals in both horizontal directions to provide 25m2 bays.
Consideration to the use of a tiling movement joint must be given in all of the following areas:
- They must be incorporated and aligned with any movement joints within the floor’s construction. The joints should be continued through the entire depth of the tile and adhesive.
- At specified distances across a floor to create individual tile beds (general consensus is that movement joints should be utilised at distances between 5m and 8m).
- Movement joints should be placed directly above any supporting walls or structural beams as they will add rigidity to the floor. The remaining floor area may be prone to a degree of flex or vibration.
- Junctions between floors and walls.
- Internal Walls – movement joints should be provided:
- Over existing and/or structural movement joints
- Where tiling abuts other materials
- Where tiling is continuous across junctions of different background materials
- In large tiled areas, at internal vertical corners and at 3m to 4.5m centres horizontally and vertically (where large degrees of thermal movement or vibration are expected, the frequency of movement joints should be increased to accommodate the movement)
- Where stresses are likely to be concentrated, for example at changes of alignment
- Movement joints should be of a suitable width to permit the sealant to accommodate the expected movement (typically 5mm).