blog, commercial blog, how to articles
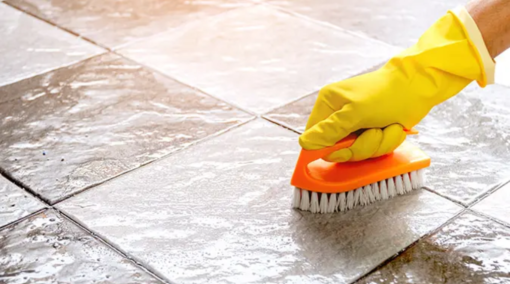
When it comes to tiling projects, using the right adhesive is crucial for achieving a durable and long-lasting finish. Properly applied adhesive ensures that tiles adhere securely to the surface, preventing cracks, loose tiles, and water damage.
In this comprehensive guide, we will walk you through the essential steps and best practices for using adhesives in your tiling projects, enabling you to achieve professional results and create beautiful tiled surfaces that stand the test of time.
1. Select the Right Adhesive:
Choosing the correct adhesive is the first step towards a successful tiling project. Consider factors such as the type of tiles you are using, the substrate (surface) you are tiling on, and the environment in which the tiles will be installed.
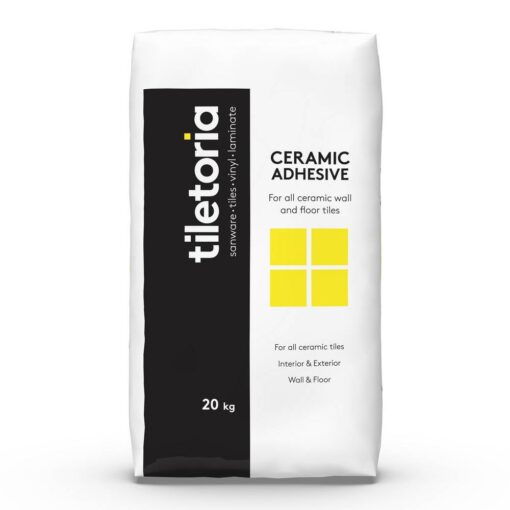
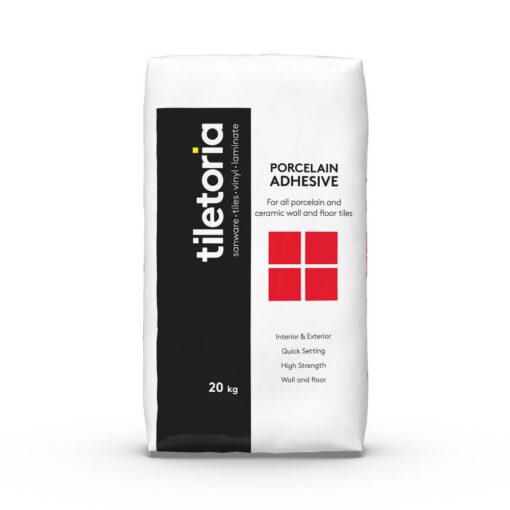
Different adhesives are formulated for specific applications, such as ceramic, porcelain, or natural stone tiles. Select an adhesive that is suitable for your specific tile type and the surface you are working on to ensure proper adhesion and longevity.
2. Prepare the Surface:
Proper surface preparation is vital for optimal adhesion. Ensure that the surface is clean, dry, and free from dust, grease, or any other contaminants. Remove any loose or uneven areas and repair them before applying the adhesive.
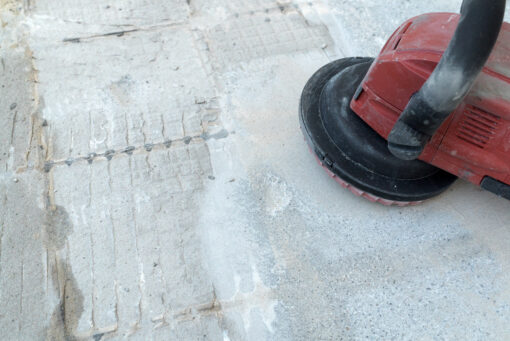
If the surface is particularly smooth or non-porous, consider roughening it with sandpaper or using a suitable primer to enhance the bond between the adhesive and the surface.
3. Mix the Adhesive:
Follow the manufacturer’s instructions to mix the adhesive correctly. Use clean water and gradually add the adhesive powder while stirring to achieve a smooth and lump-free consistency.
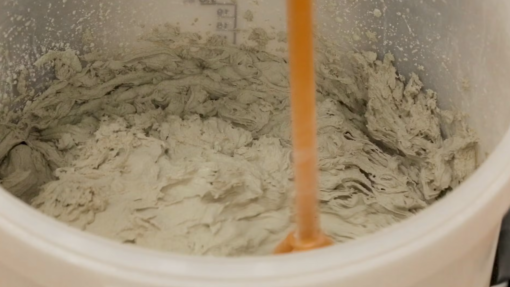
Avoid preparing more adhesive than you can use within the recommended pot life to prevent waste and ensure the adhesive remains workable.
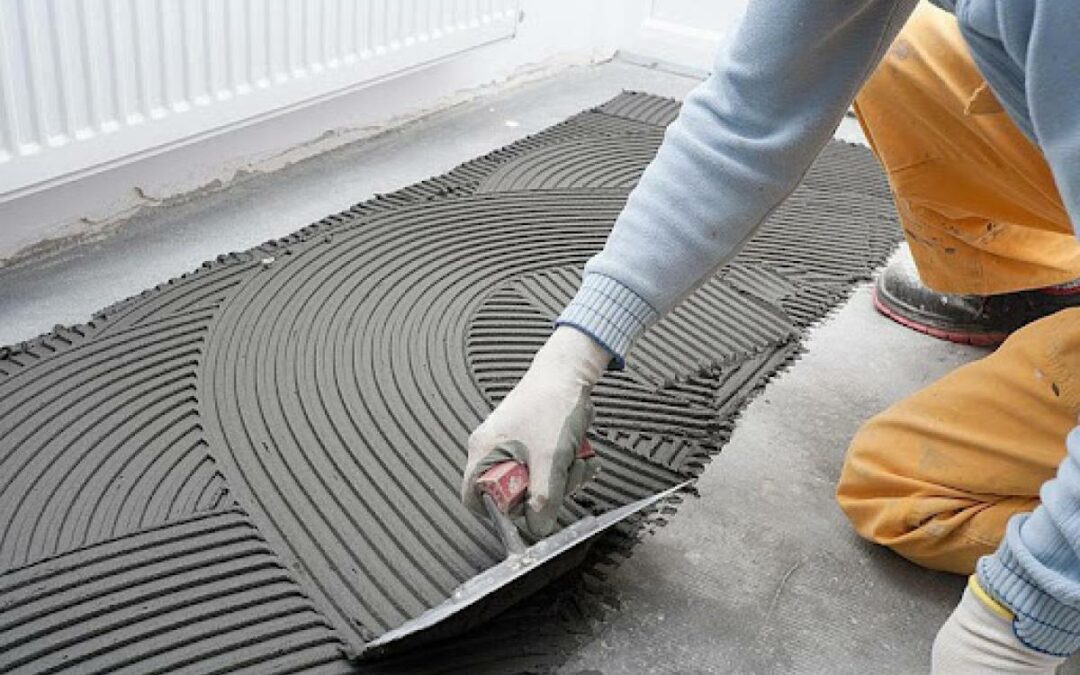
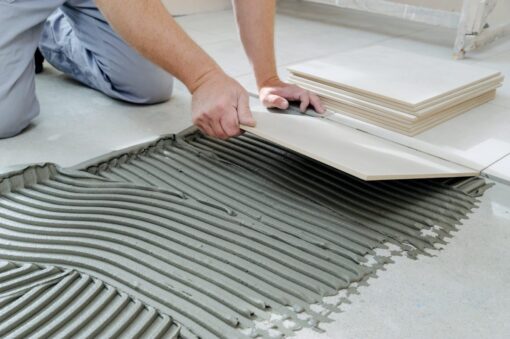
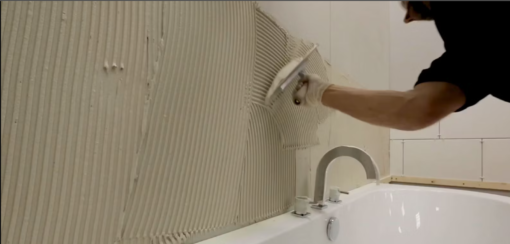
4. Apply the Adhesive:
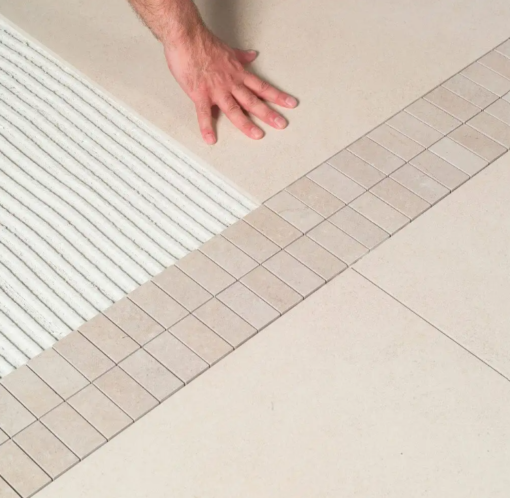
Using a notched trowel, spread the adhesive evenly onto the surface. The size of the notches on the trowel should be determined by the tile size and thickness, as well as the substrate condition.

Apply the adhesive in small sections, working in manageable areas to prevent it from drying out before placing the tiles. Keep the trowel at a consistent angle to ensure a uniform adhesive bed.
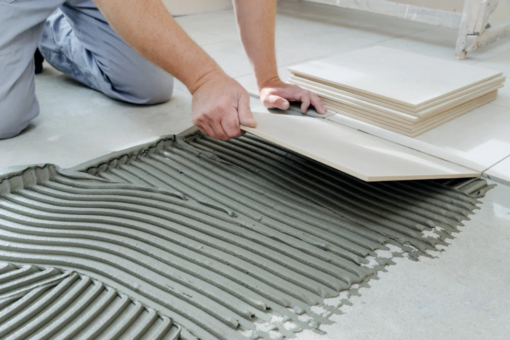
5. Tile Placement:
Carefully press each tile into the adhesive, applying even pressure to ensure good contact and proper adhesion. Use tile spacers to maintain consistent spacing between tiles and achieve straight grout lines.
Check periodically with a level or straightedge to ensure that the tiles are aligned correctly and flush with each other. Wipe off any excess adhesive that squeezes out from the joints before it dries.
6. Allow for Proper Drying and Curing Time:
Follow the manufacturer’s instructions regarding drying and curing time. Allow the adhesive to set for the recommended period before applying grout or subjecting the tiled surface to any moisture or foot traffic.
Proper drying and curing time will ensure that the adhesive reaches its maximum strength and bond.
Using adhesives for tiling requires attention to detail and adherence to proper techniques. By following this guide, you can achieve professional results in your tiling projects.
At Tiletoria, we offer a wide range of high-quality adhesives suitable for various tile types and applications. With the right adhesive and proper techniques, you can confidently tackle any tiling project and enjoy beautiful, long-lasting results.
Visit our showroom in Cape Town or Johannesburg to explore our selection and consult with our knowledgeable staff.
bathroom, blog, commercial blog, how to articles
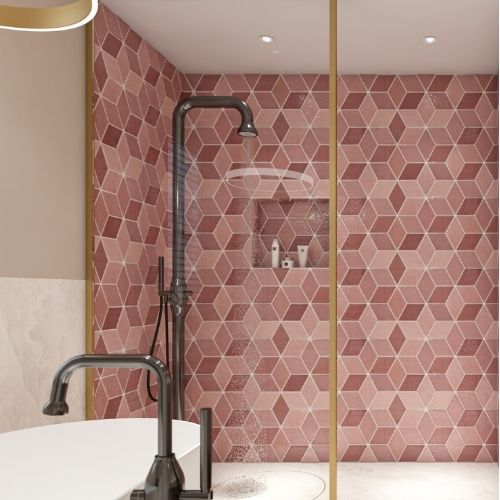
Tiling a bathroom floor is a crucial step in creating the perfect bathroom. It not only enhances the aesthetics but also contributes to the functionality and durability of the space. Having a clear understanding of the steps involved in tiling a bathroom floor is essential.
In this blog, we will guide you through the process, providing professional advice to help you achieve a flawlessly tiled bathroom floor that adds charm and elegance to your space.
1. Plan and Prepare:
Before diving into tiling, proper planning and preparation are essential. Measure the floor accurately to determine the amount of tile needed. Consider factors such as tile size, colour, and pattern to ensure they complement the overall design of your perfect bathroom. Tiletoria offers a wide range of tile options, catering to various styles and preferences.

Prepare the surface by ensuring it is clean, dry, and free of any debris. If necessary, remove the existing flooring and repair any imperfections or unevenness. Tiletoria also offers a selection of high-quality adhesives and grouts specifically designed for bathroom floors, ensuring optimal results.
Estimating the required amount of tile and the overall cost of your project is crucial. If you’re wondering how to calculate the precise tile quantity you need, explore our blog How to calculate how much tile you need. There, we provide a detailed explanation of the step-by-step process to accurately determine the tile quantity for your specific project. By following our guidelines, you can confidently plan your project and avoid unnecessary expenses.
2. Start with a Solid Foundation: Apply Adhesive
Begin by applying a suitable adhesive to the prepared floor surface using a notched trowel. Work in small sections to prevent the adhesive from drying out before laying the tiles.
3. Lay the Tiles:
Carefully lay the tiles on the adhesive, starting from one corner of the room. Use tile spacers to maintain consistent gaps between tiles for grouting. Tiletoria provides a variety of tile sizes and styles to suit your design preferences, ensuring a personalized touch to your bathroom floor.
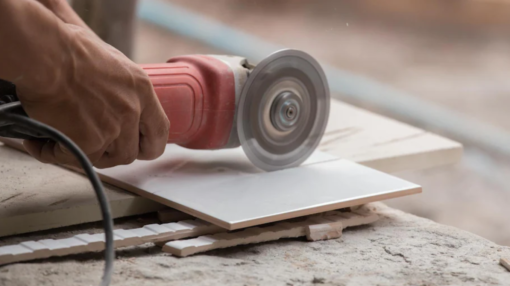
Take time to ensure the tiles are level and properly aligned. Use a tile cutter or wet saw to make necessary cuts for tiles at the edges or around fixtures.
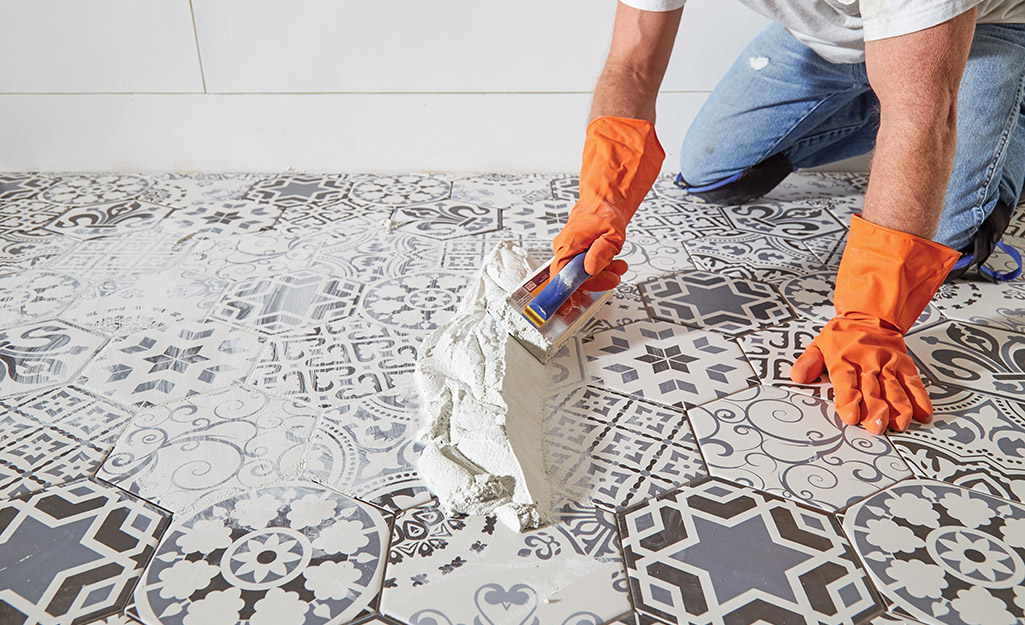
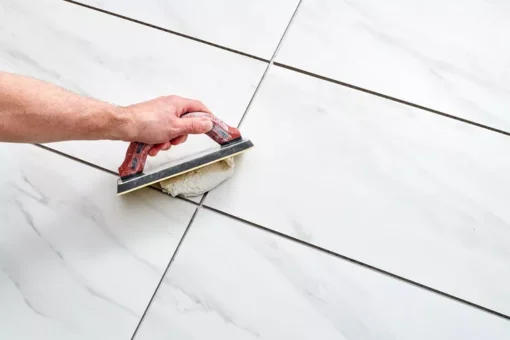
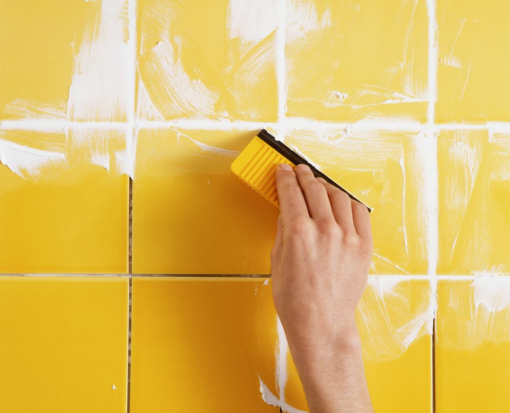
4. Grout the Tiles:
Once the adhesive has fully cured, typically after 24 to 48 hours, it’s time to grout the tiles. Choose a grout colour that complements the tiles and desired aesthetic of your perfect bathroom.
If you’re unsure about how to choose the right grout colour for your tiling project, we have the perfect solution. Check out our blog on How To Choose The Right Grout Colour, where we guide you through the process of selecting the ideal grout coluor to enhance the overall aesthetic of your tiled space.
Mix the grout according to the manufacturer’s instructions, and use a grout float to apply it, ensuring it fills the gaps between the tiles completely.
Wipe off any excess grout using a damp sponge or cloth. Tiletoria offers a variety of grout options, to ensure longevity and easy maintenance of your bathroom floor.
5. Finishing Touches and Sealing:
After the grout has dried for the recommended time, carefully clean the tiles to remove any grout haze. Use a suitable tile cleaner to ensure a spotless and polished finish. Consider applying a sealer to the grout and tiles to protect them from moisture and stains, enhancing the longevity of your bathroom floor. Tiletoria offer a variety of installation products to ensure your bathroom floors are affordable and resilient.
Tiling a bathroom floor requires careful planning, preparation, and attention to detail. By following our professional advice and utilizing our extensive range of high-quality tiles, adhesives, grouts, and tools, you can achieve a flawlessly tiled bathroom floor that contributes to the perfect bathroom you envision.
Take the leap and create a bathroom floor that combines functionality, aesthetics, and durability, transforming your space into a haven of beauty and style.
For more tips and advice on tiling, visit your nearest Tiletoria showroom and chat to our sales team for advice.

bathroom, blog, how to articles
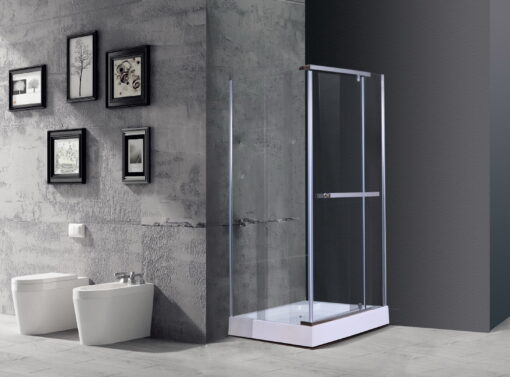
Choosing the right shower door for your bathroom can be a daunting task. With so many options available in the market, it’s easy to get confused and end up making the wrong choice. However, with a little bit of research and knowledge of the critical factors to consider, you can choose the perfect shower door for your bathroom that not only looks great but also provides functionality and durability.
In this blog, we’ll discuss the essential factors to consider while choosing your bathroom shower doors.
Type of Shower Enclosure
The type of shower enclosure is the first thing to consider while selecting a shower door. The most common types of shower enclosures are alcove, corner, and walk-in showers. Each type requires a different type of door, and it’s essential to choose the right one that fits your bathroom’s design and layout.
Space and Layout
Another crucial factor to consider is the space and layout of your bathroom. You need to measure the height, width, and depth of the shower area to ensure that the door you choose fits perfectly. If you have a small bathroom, a sliding or bi-fold door may be a better option than a swinging door that takes up more space.
Glass Type
Shower doors are available in various glass types, including clear, frosted, tinted, and textured. The type of glass you choose depends on your preference and privacy requirements. If you want more privacy, frosted or textured glass may be a better option, while clear or tinted glass is ideal if you want to showcase your bathroom’s tilework.
Glass Thickness
The thickness of the glass is another crucial factor to consider while choosing a shower door. Thicker glass is more durable and long-lasting, but it’s also heavier and more expensive. The standard thickness of shower glass is 3/8″ or 1/2″. Thicker glass is ideal for larger shower enclosures or where safety is a concern.
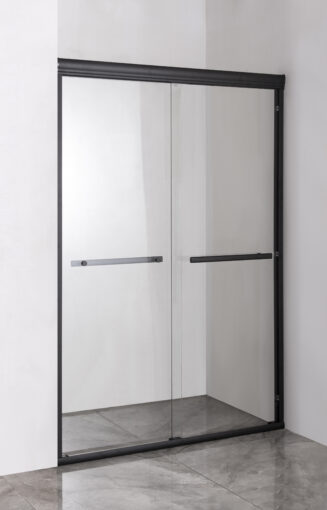
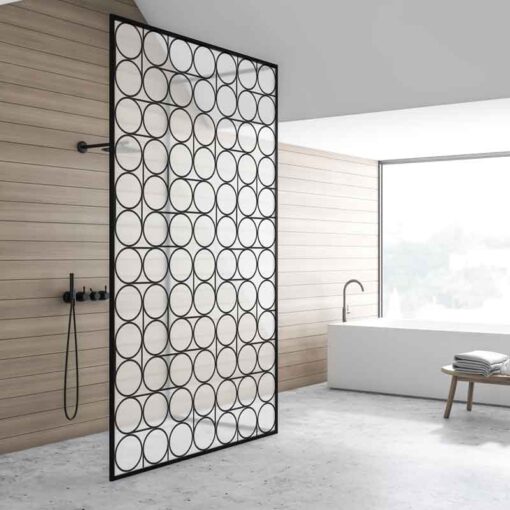
Frame or Frameless
Shower doors are available in both framed and frameless options. Framed doors have a metal frame around the glass, while frameless doors have no frame and use hinges to attach the glass directly to the wall. Frameless doors are more expensive but provide a sleek and modern look, while framed doors are more affordable and offer more design options.
Hardware
The type of hardware you choose, such as handles, hinges, and towel bars, can significantly impact the overall look and feel of your bathroom. It’s essential to choose hardware that complements the style and finish of your shower door and other bathroom fixtures.
Check out our Tiletoria Trends feature, where Ryan O’Connor and Deon Bing take you through our step-by-step guide to choosing the right shower door for your space
In conclusion, choosing the right shower door for your bathroom requires careful consideration of several critical factors. The type of shower enclosure, space and layout, glass type and thickness, frame or frameless, and hardware are all essential factors to consider.
By keeping these factors in mind and working with a professional if necessary, you can choose the perfect shower door that meets your needs and enhances the overall look and functionality of your bathroom.

bathroom, blog, how to articles, robin sprong wallpapers blog
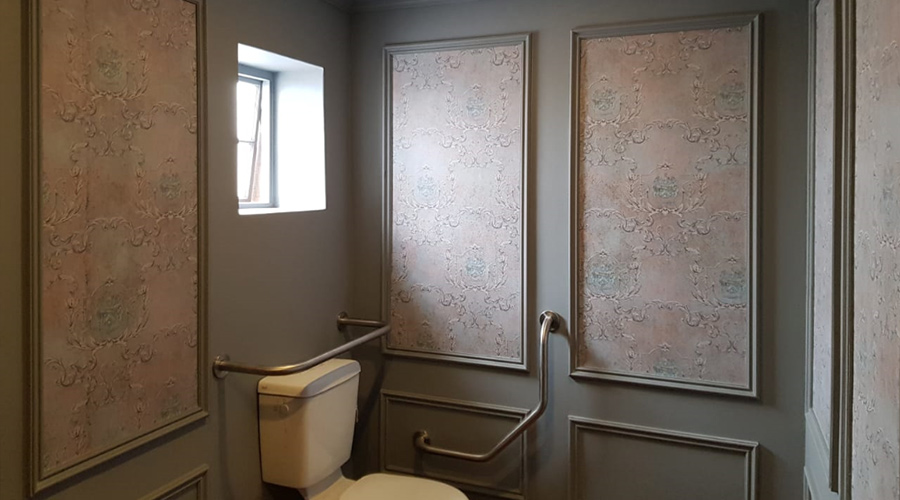
When picking my wallpaper, how important are the colours and fixtures in my bathroom?
Clients most commonly come to us with their bathroom almost complete. By this stage, it is usual to see that a colour palette has been chosen, alongside matching fixtures objects like the shower rail, washbasin and taps, shower/bath and taps, and floor tiles.
So, we often end up creating a design that fits in with the style of the bathroom that’s already present.
In a perfect world, you might choose to plan your bathroom wallpaper earlier when planning the design of your bathroom overall – but more often than not, building practices are drawn out and stressful and there’s more of a focus on getting this side of the process started as soon as possible.
Thus, it’s a popular approach to pick neutral tones and muted hues that will blend well with the rest of your design choices for your bathroom.
Have a look at these elegant wallpaper panels we created to style a client’s bathroom. It adds to the atmosphere of the room, but subtly as an elegant design that punctuates adds some flair to the neutral-coloured nature of the space.

If you’ve already defined the look for your bathroom, stay in line with the theme broadly but don’t be afraid to stray slightly to add some contrast and creativity.
For a small bathroom space, having a feature wall with a design that draws the eye into the scene and away from the walls blank canvas.
Have a look at our ideas for creating bathroom wallpaper for a guest bathroom – which is typically a smaller sized space, to which you can add sparks of personality.
The Guest Bathroom
The guest bathroom is slightly different from a personal bathroom.
Like shared spaces, it’s more common to see imagery, patterns or colours that are more universally accepted or pleasing to the eye.
But, it’s not uncommon for someone to choose to style their guest bathroom with a slightly unique vision in mind – as it’s a lesser-used space and can be an area show off some creativity or take a risk.
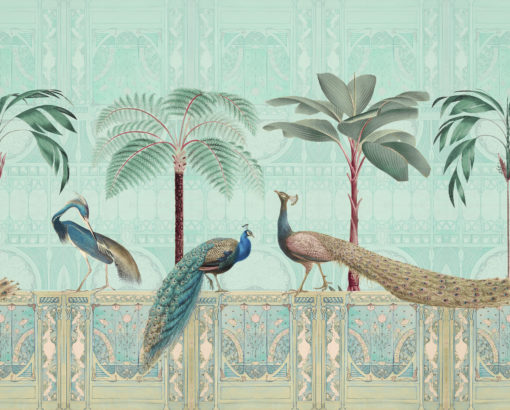
Here, some of the themes we’ve already mentioned still reign true. Popular choices include bathroom wallpapers featuring patterns of birds, flowers, plants and a distinct contrast between these forms and a darker or lighter background colour.
Another popular choice, that you might not think of initially when the idea of styling your bathroom is whirling around in your mind – is fish.
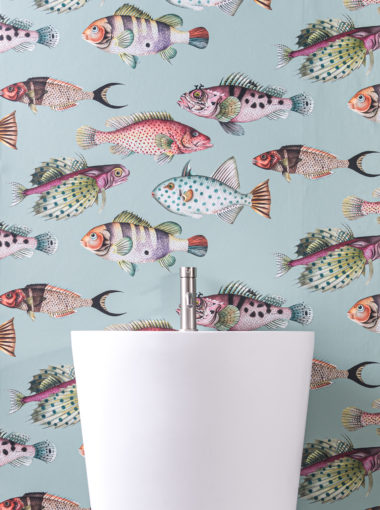
Bathroom wallpapers with fish can create a very interesting feel in a small bathroom. This still sticks to the overall theme of nature, but aquatic instead.
The range of blues associated with the ocean makes a fantastic base background for the wallpaper, which is contrasted by detailed and colourful fish forms.
This creates the depth you’re looking for, whilst the theme of nature is consistent and provides a tranquil feel alongside calming blue tones, used to represent the ocean.
The wallpaper design also has a funky, lighthearted feel, as you’re surrounded by fish with different colours, shapes and sizes. The natural intricate detail of a fish provides an eye-catching edge too.
Final part coming soon…
For any practical advice or assistance, call the Tiletoria Sales Team or visit their closest showroom.
bathroom, blog, how to articles, robin sprong wallpapers blog
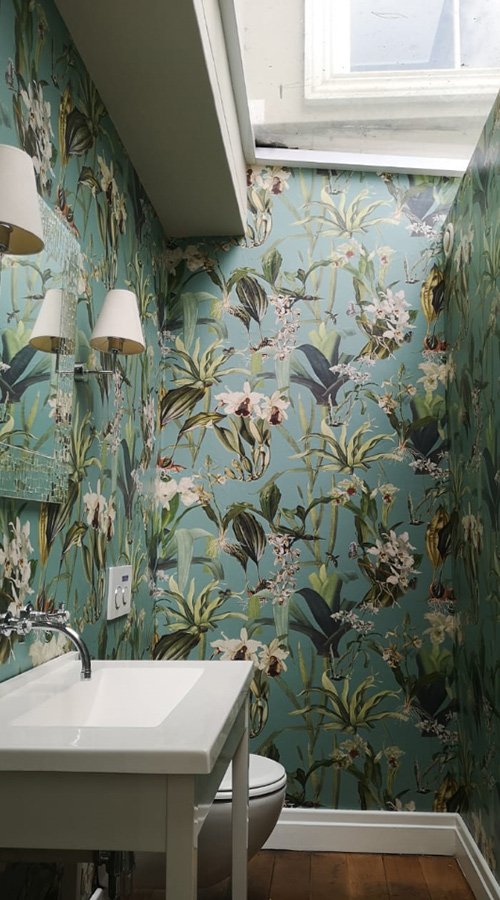
Finding bathroom wallpaper ideas can be a difficult task, some might even view a bathroom as one of the more challenging environments to style. To help get you started with picking a style for your bathroom wallpaper, we’ve compiled a range of tips for picking wallpaper colours, wallpaper patterns and creating the kind of theme you have in mind:
Which vinyl wallpaper works best in the bathroom?
The fact that there’s moisture within the bathroom space, is a concern but one that can be placated. We will cover ways to deal with this concern later. For some people, choosing their bathroom space is more about not ending up with a standard white and chrome design scheme. Although, there’s nothing wrong with an elegant design scheme, but with bathroom wallpaper, you have a vehicle to emphasise and express any theme or atmosphere that you wish.

This wallpaper, for example, emphasises elegance by taking a vintage, floral-inspired twist. The artist, Jessica Warrwick, loves to illustrate the feeling of fun, whimsical movement combined with the opulent abundance of the natural world. The result is a bathroom wallpaper with muted tones that creates a classy environment.
Choose Your Prefernce from Options Like:
- rustic wallpaper
- modern wallpaper
- floral wallpaper
- landscape wallpaper
- photographic wallpaper
- textured wallpaper designs
Adding a Personal Touch
Unlike a shared space like a living room, which needs to be welcoming to guests, a bathroom is more of an experimental space. It’s popular when styling a bathroom to come across more striking themes and creativity, that relates strongly to a couple or someone’s personal taste. This means that the approach for designing your wallpaper will differ, depending on personal preference, the colour scheme, and fixtures you’ve chosen for the bathroom.
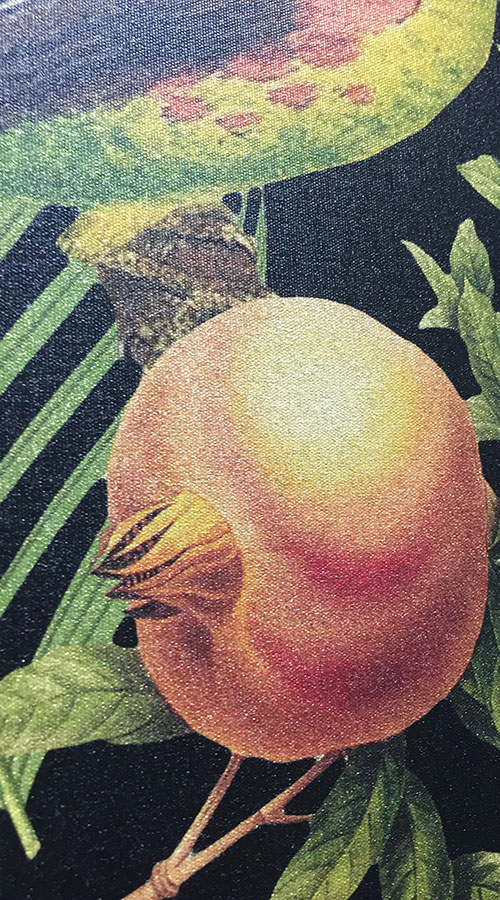
Bathrooms are often associated with the theme of nature which can be important to someone for a variety of reasons.


For some, nature is where they feel at peace. For others, the intricate detail and vibrant colours that nature serves to us on a platter are too much to resist when designing a bathroom wallpaper. Both the atmosphere created by nature and the detail of the wildlife and floral forms are important elements to a natural wallpaper.
The detail of the natural forms is brought to life by specific colours that have a purpose within the piece, the same way nature’s purpose within a bathroom wallpaper provides a sense of calm.
Selecting the right material on which to print your wallpaper
Bathrooms are wet spaces, subject to steam, splashes, spills and drips, wherever they might occur, so you need a wallpaper that will be able to stand the test of time. Steam is a primary factor that makes choosing a wallpaper for your bathroom a bit tricky. Steam can make wallpaper curl and decay designs, so it’s important to pick a durable surface to print your wallpaper on.
For starters choose solid vinyl, fabric-backed vinyl or paper-backed vinyl, as these provide the best splash proof wallpaper surfaces. Picking a plastic-based material will have result in a slight sheen or noticeable reflection, but the plastic nature of the material allows you to clean your wallpaper gently and easily. It also makes the wallpaper slightly water resistant, and this can help with any splashes of water or droplets of moisture left on the walls.


Vinyl wallpaper with a woven backing is also great for the bathroom, as it provides durability against slightly harsher scrubs and nicks. The textured nature of the wallpaper also provides creative room for enhancing the artwork or design. Certain imagery, like rustic wallpapers, vintage wallpapers and floral wallpapers can benefit from this additional texture for added intricate detail.
Part 2- coming soon…
For any practical advice or assistance, call the Tiletoria Sales Team or visit your closest showroom. Tiletoria Paarden Eiland is an official retailer of Robin Sprong Wallpaper so pop in store for inspiration or to get a quote.
blog, how to articles, renovation tips
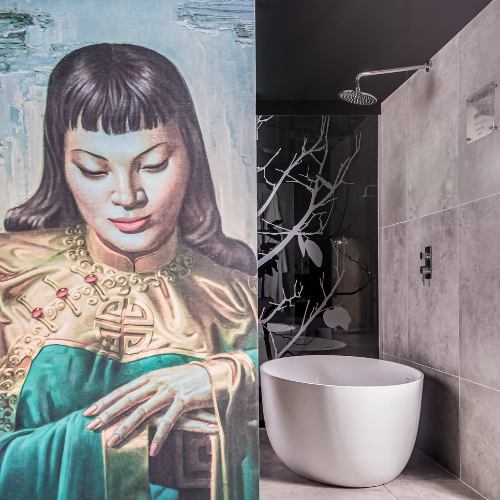
Deon Bing knew from an early age that the outdoors were going to form a major part of his life. Surfing, trail running, lake swimming, skating and travelling – squeezing everything out of the day. Fast forward a few years and nothing has changed – his love for the environment has continued to grow. He’s been able to share these passions through his Radio Surf Report for nearly 3 decades. In addition, he brews and distributes his own craft beer and runs a video production company, Bing Digital. He has been an ambassador for Tiletoria for many years, and recently renovated his bathroom. Read about his experience, get some advice and inside tips before starting your own renovations.
In the first part of our two part series on renovating a bathroom, we discuss the project overview, questions to ask your self and practical considerations before going ahead with your dream bathroom renovation. Once you’ve gone through that process and have an idea of the direction you want to take, it’s time for the costing and detail.
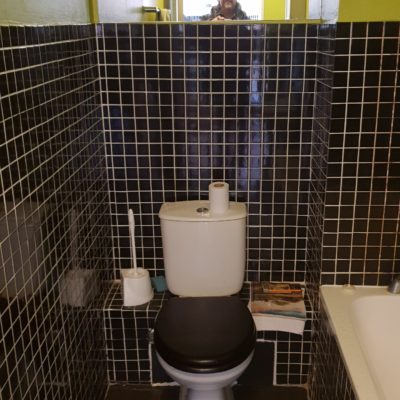
Our bathroom in an old Woodstock flat needed help – lots of it.
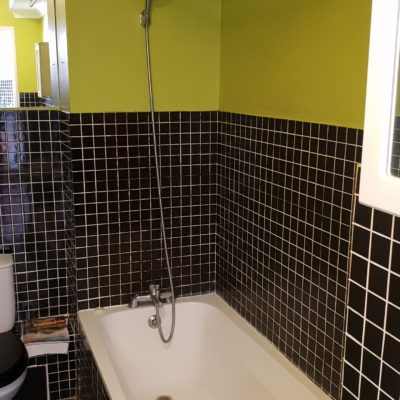 It’s weird how one gets used to peeling, lumo green walls, black mosaic and a faded yellow bath and toilet. Then, one final morning, after more than a year of lockdown and working from home, it smacks you between the eyes and you scream – ENOUGH!! This has to go…everything! You might be in a similar situation?
Maybe you walked into the bathroom of a new boutique hotel and were blown away with what’s possible and where the latest looks are headed? But take a breath and maybe some tips from my experience before diving in. There are so many little things to be taken care of and to plan for, before you start buying taps and tiles. You don’t want to be making costly changes down the line. I’d taken the decision to renovate, but wasn’t a builder, tiler or designer, plus didn’t have an unlimited budget. I’d have to focus and plan, understand the process to get what I wanted and keep costs realistic. It’s not just a tiler you need, it’s a plumber too. And an electrician that can install approved power and lights for bathroom use – which have different requirements to the rest of the house. And someone to jackhammer the old tiles off and a project manager to oversee that all the elements come together in sequence. But let’s go back to you in your bathroom.
FIRST THINGS FIRST – Some questions
- Take a shower or bath and practically look at what you’d like to change. Is it only you who uses the bathroom, or is there more input needed?
- Whats not working for you, what is? Is the layout correct, is the basin or shower big enough?
- Is there enough water pressure? Is the ventilation sufficient or is the fan too noisy?
- What would be the ideal scenario in your new bathroom?
- Do you still need both a bath and shower – I removed the bath completely and put in a nice sized walk-in shower.
- Is there enough storage – look at the variety of shampoos and face scrubs and medicines and the rest – do you need extra space for those? Or kiddies bath toys?
- A big mirrored cabinet could help, with subtle, understated lighting.
- There are often times, like the middle of the night, when you don’t need all the lights to be turned on.
- Heated towel rails or underfloor heating?
Before even thinking of the aesthetics, understand your basic requirements for the bathroom to be practical and functional and work for you and your family. Ideally, if you can stick with the existing layout, then you won’t have to make any major structural and plumbing changes.
Measure the space you have to work with. It’s important that you don’t get baths or basins that won’t fit the area – i.e. a basin too big that the bathroom door can’t open – nearly happened! Make sure there’s plenty of space between everything.
Now it’s time to get creative and play with some ideas!
GET CREATIVE
Look at the Tiletoria website, Pintrest, Studio McGee, Amber Interiors.
Colours – what goes together?
Floor styles and wall tiles, light fittings and ceiling finishes, baths, shower roses and glass doors and basins, taps and towel rails, mirrors, toilets and all the details that go along with it – so many options!
Narrow it down to the look and feel and then…reality.
The budget.
Part 2- coming soon…
For any practical advice or assistance, call the Tiletoria Sales Team or visit their closest showroom.
Deon Bing©